Here is a link to a You Tube Video showing you how to emboss using your Nestabilities & Cuttlebug and your cuttlebug.
With the Cuttlebug, you can both cut and emboss using Nestabilities.
Cutting with Nestabilities (Stack from bottom up)
1. A plate
2. C plate
3. Nestabilites die face up (flat side down)
4. Paper or cardstock
5. B plate
Run through Cuttlebug machine.
Embossing with Nestabilities in the Cuttlebug (Stack from bottom up)
1. A plate
2. B plate
3. Die face up (flat side down)
4. Card front taped to die
5. 3 pieces of cardstock
6. 1 Spellbinders tan polymer mat
7. 2nd B plate
Run through Cuttlebug machine

Wednesday, March 04, 2009
Monday, February 23, 2009
Gift Box Tutorial by Kerrie Gurney
This is a quick and easy project for you to make - boxes filled with Easter eggs make a great teacher gift for this Easter or just fill with something special for that special person in your life.  Products Needed

Step 2 - Turn cardstock vertically and score at 2" & 7"
 Step 3 - Holding cardstock horizontally with the small section at bottom, cut all but one section off. Next on 2" section cut off small piece and then cut all fold lines up to horizontal fold line making flaps.


 Step 7 - place super tape on side flap and bottom flap

Step 8 - Stick a piece of acetate over oval and then fold box up.

 Products Needed
1 pc Cardstock - 8.5 "x 11"
Trimmer with or without bone scorer blade
Bone Scorer (if you have a trimmer with a scoring blade you don;t need this)
Scissors
Crop-a-dile
Cuttlebug
Cuttlebug Embossing Folder
Nestabilities Dies - Oval Scallop and Rectangle Scallop
Super Tape
Ink Pad
Stamp
2" Scallop Punch
Ribbon
Acetate
Step 1 - Place your cardstock horizontally on your trimmer and score at 2", 5", 7" & 10"

Step 2 - Turn cardstock vertically and score at 2" & 7"
Step 3 - Holding cardstock horizontally with the small section at bottom, cut all but one section off. Next on 2" section cut off small piece and then cut all fold lines up to horizontal fold line making flaps.Step 4 - Place oval nestability onto front section and run through cuttlebug (tape into place so it doesn't move)
Step 5 - place rectangle nestability with only one edge under cardstock so only the one edge cuts.
Step 6 - fold the box in half and run through cuttlebug using embossing folder
Step 7 - place super tape on side flap and bottom flapStep 8 - Stick a piece of acetate over oval and then fold box up.
Step 9 - Punch Holes for ribbon

Step 10 - stamp image and punch out with scallop punch (or nestability) attach to box with ribbon.
Thank you to all who attended my demo on Saturday you were all so lovely i had a great time
Kerrie
Sunday, January 25, 2009
CHA Sneak Peeks #1
It is that time of the year again for all of you scrapbookers, stampers and card makers hanging out to see what new products we will be getting this year - CHA Winter 2009 has officially started and if you would like to see more of the fantastic new products being released click on the manufacturers links


*remember these products won't hit our shores until late feb through to mid year, so please do not go into the store tomorrow and expect to purchase these :).
Thursday, December 11, 2008
Merry Christmas Banner

One of our lovely customers Jenni Davies created this gorgeous Christmas banner to decorate her home this Christmas.
Jenni has used the Sandylion Kelly Panacci Christmas Range and her Cricut for cutting out the letters.


Saturday, June 14, 2008
Weekend Inspiration - Hanging Canvas Album by Kerrie Gurney

This canvas wall hanging is something that you can create in under 60 mins
A great gift for or just something to brighten your wall
Materials Used
Making Memories - 5th Avenue Sophia Collection
Making Memories - Sweets
Making Memories - Pebble Brads
Making Memories - Cheeky Clip board Clips
Paper Flowers
ACP Ribbon
5"x7" Canvases
Black Cardstock
Tools
Xyron Cheetah Adhesive Runner
Crop-a-Dile
Graphite Black Brilliance Ink Pad
Instructions
For all canvases - cover front with pp, added embellishments & ribbon, inked around the edges with black ink pad, then i covered the back with black cardstock just to finish off. then you need to punch holes in top and bottom using your crop-a-dile. (except the last canvas you only need to punch holes in the top of the canvas) tie canvases together using your ribbon and one at the top to hang your hanging album with


Thursday, February 07, 2008
Mid -Week Inspiration - My Dad's Journey by Gayle Bowden
Our Store Manager Gayle is doing an album about her Dad's journey through life.


There are not alot of photo's of Gayle's Dad from when he was younger but lots of stories to be told. Gayle wanted to make a scrapbook not only with photo's but to be able to share the stories, adventures and twists and turns his life took. It is sometimes very difficult to add large amounts of journalling and stories with out taking over an album- but Gayle has it coming together beautifully. This album will not only hold Gayle's stories about her Dad but stories and adventures of other family members and friends.
so here are some of Gayle's pages
My Dad, My Hero page with poem My Dad written by Michael Ferry. (Double page)
Materials Used:
New range -Kaiser 12 x 12 papers in the Grunge range.
Matted with bazzill and prismatic card stock.
Kaiser rub ons flourishes in white
Making Memories Evolution in white alpha.
Photo printed in sepia to match papers.
Make sure to co-ordinate the papers, rub ons and matting on both pages so that they belong together. Adding a poem written by Gayle's brother about her Dad adds a personal touch to the journalling. A smaller piece of journalling on the first page explains what the photo is all about.


Country Kids - double page with printed story
New range -Kaiser 12 x 12 papers in the Grunge range.
Matted with bazzill and prismatic card stock.
Kaiser rub ons flourishes in white and black
Kaiser rub ons verses in black- cut up to go around the star
Making Memories Evolution in white alpha.
Photo printed in sepia to match papers.
Same principal as above pages- although Gayle has added a Kaiser verse rub on around the star. Gayle had to cut the verse up to make it fit. Gayle has also added a black flourish rub on on the bottom right hand corner of the photo to bring in a bit of black from the papers. Again making sure to co-ordinate papers, rub ons and matting on both pages to make it consistant.


Double page layout of journalling and story telling.
No photo's just journalling and story telling. These two pages go with the 4 pages above. So once again Gayle made sure to co-ordinate the card stock and papers with the other 4 pages. Gayle also kept it consistant and made sure she added rub ons on both pages, adding a large flourish flower at the end of the story. Both pages have the same page layout and both have a similar rub on down the left side of the journalling to show they belong together.
No photo's just journalling and story telling. These two pages go with the 4 pages above. So once again Gayle made sure to co-ordinate the card stock and papers with the other 4 pages. Gayle also kept it consistant and made sure she added rub ons on both pages, adding a large flourish flower at the end of the story. Both pages have the same page layout and both have a similar rub on down the left side of the journalling to show they belong together.


we will share some more of Gayle's layouts next week.
Tuesday, August 29, 2006
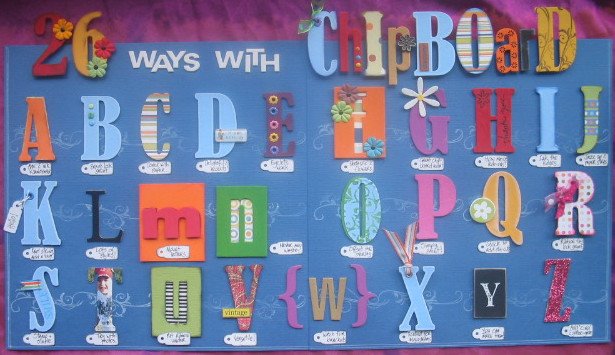
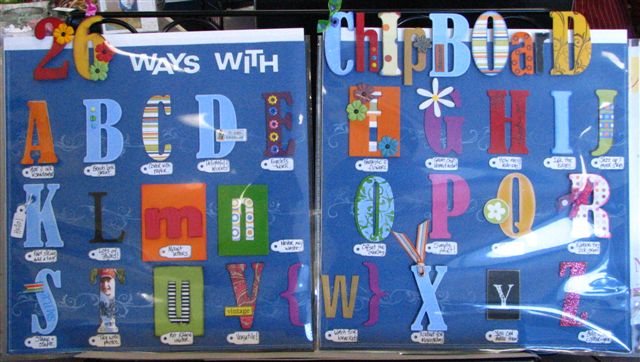
Inspiration Week 1 - 26 ways with Chipboard
Ok we thought a great way to start off our Blog weekly Inspiration would be with Chipboard - we all have chipboard it would have to be the most versatile product to enter the scrapbooking/stamping world.
So here is a sampler that one of our team members Catherine came up with to inspire you to try something new when using your chipboard whether it is chipboard alphas or shapes, there is something for everyone to try.
A - Age, Ink, Sandpaper
B - Brads look great
C - Cover with paper
D - Delightful Accents
E - Eyelets work
F - Fantastic flowers
G - Great Chipboard Accent
H - How about rubons
I - Ink the edges
J - Jazz up paper strips
K - Knot string, add a tag
L - Lots of styles
M - Mount Letters
N - Never waste any
O - Offset the overlay
P - Simply Paint
Q - Quick to add diecuts
R - Ribbon ties look great
S - Stamp & Staple
T - Try with photos
U - Put ribbon Under
V - Versatile
W - Watch for brackets
X - Xcellent for monograms
Y - you can make them
Z - add "Zing" glue & Glitter
Don't forget to share your chipboard creation with us all by loading them into the gallery in our forum.
Subscribe to:
Posts (Atom)